Creating a new page
Elevate allows both remote (Using Accedo One) and local menu definition. Both models are based on the Elevate Vikimap base model By default, the remote model is defined so let's start by defining how to switch to local in case it is needed.
Using local navigation/menu
In order to use the existing local file for the app navigation, you need to set the Environment variable LOCAL_VIKIMAP to true
This will indicate the app (as implemented in src/service/vikimap/index/js) to use the local file located in src/service/vikimap/index/map.json
This file can be modified and new pages can be added by adding new values in the items array with the following fields:
route: path of the page route, starting by the slash (/) character.hiddenWhenAuth: If must be hidden when auth.image: url of the image to use in the menu item.page: Page as defined in CMS Pagetitle: This is used here as it cames from Accedo One, but it is not used.itemGroup: (primary|secondary) type of the item.primary(left section) orsecondary(second section)id: This is used here as it cames from Accedo One, but it is not used.menuItems: array of MenuItem as defined in https://accedobroadband.jira.com/wiki/spaces/VDK/pages/186581294/Vikimap#MenuItem-entry-typedisplayText: text to display in the menu item.requiresAuthentication: If must be hiden when non-auth.
Using remote navigation/menu
You can create new pages using Accedo Control by adding a new Entry of the Page with the proper template value and any desired container and theme and then creating a new Menu type in your project, with the page created before and linking it into the proper menu used in the application taking into account what stage/environment and custom conditions are used.
Please review that the entry is properly published in the desired platform in the list of availabilities of the Entry
Note: If you want to create a new page type/template. You will need to update the Page entry type beforehand.
You can use the above list of fields in order to understand how the menu item will be display and behave.
New View
Every view in Elevate must use Page component (src/components/Page/Page.js)
Note: We have recently added a Container: PageLayout that handled the CMS Layout page fetch for you directly based on the route configuration. You will need to add the new route on the pageLayoutMapPages from the config/routes.js file
The definition of the pageLayoutMapPages items use the following Data Model:
template: the template to map against from the CMShasSubroute: whether it's a subroute or notsuspense: whether it has to use React.SuspenseanalyticsScreenType: value of the analytics screenType for the routeanalyticsOnPageLayoutLoad: whether the page should report the screenView directly when pageLayout is loadedview: associted View Component
The Page component is an adaptation of the Page component of the package @accedo/vdkweb-tv-ui but without using Redux. That component does not allow its usage without using Redux so the Elevate's Page component is using Context to share with other components the needed information. For now only the TvHeader component needs that information.
The component allows custom props for the following functions:
-
onBackwardDidMount: it will be called when the component is mounted after a back navigation.
-
onBackwardWillUnmount: it will be called just before the component is unmounted after a back navigation.
-
onForwardDidMount: it will be called when the component is mounted after a push navigation.
-
onForwardWillUnmount: it will be called just before the component is unmounted after a push navigation.
-
restoreLastFocusedElementOnMount: true if you want Page component will handle the last focused element.
-
saveFocusedElementOnUnmount: true if you want Page component will focus the latest focused element when you're going backwards.
You can use these callback functions to control the focus of the page, do request data.
Example
import Page from '#/components/Page/Page';

[...]

const onForwardDidMount = useCallback(() => {
  // note: if we are getting data using this function callback, we must to control it on backward navigation as well.
  getPageData();
}, [getPageData]);

const onBackwardDidMount = useCallback(
  latestState => {
    const someProperty = latestState && latestState.someProperty;
    getPageData(someProperty);
    // note: as we are using restoreLastFocusedElementOnMount prop, we do not neet to worry about focus management.
  },
  [getPageData]
);

  <Page
    id={pageNav.id} // Needs to be unique per page
    nav={pageNav}
    onBackwardDidMount={onBackwardDidMount}
    onForwardWillUnmount={onForwardWillUnmount}
    restoreLastFocusedElementOnMount
    saveFocusedElementOnUnmount
  >
Static view with dynamic content from CMS
All pages in Elevate need to ask the CMS about the different options. The CMS must provide the containers, the theme, the template... see the page modle for more information
Note: We have recently added a Container: PageLayout that handled the CMS Layout page fetch for you directly based on the route configuration. You will need to add the new route on the pageLayoutMapPages from the config/routes.js file
The ContainerPage component is ready for rendering the layout to the CMS and doing the necesary request to get the Data, so we can use it for building our page with static part.
The movie detail page is build using this approach.
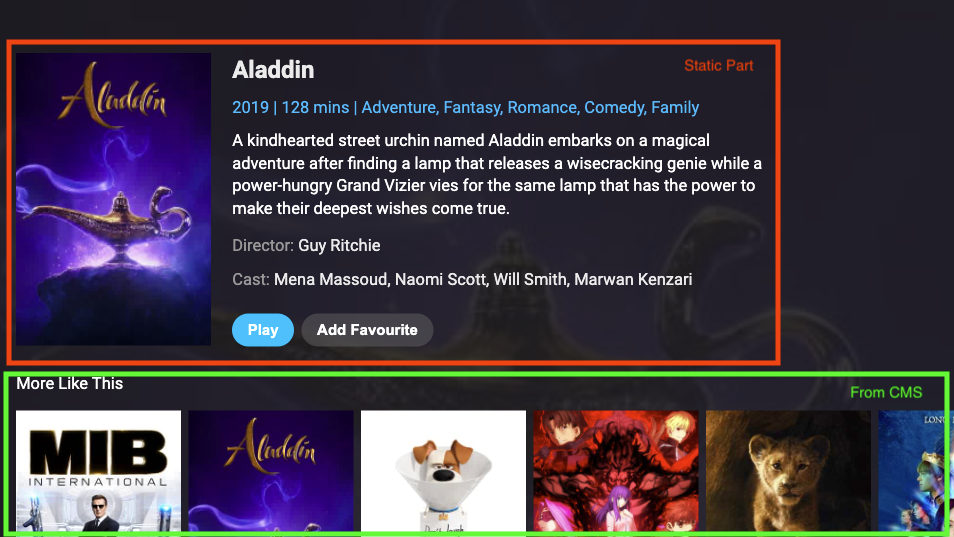
We strongly recommend to build the page following this apporach:
IMPORTANT
The container page uses the component VerticalLayout and this component creates the nav object for using the correct navigation in the application between components and scroll up/down the page. For this reason is important that your static component waits for nav in its props. This nav object has the information about the parent, and therefore the forwardFocus can work properly. Lets see the example. You can check /src/components/Search/Search as an example.
Example
const MyComponent = ({nav, ...props}) => {
  [...]
  return (
    <FocusDiv nav={{...nav, forwardFocus: 'OTHER_COMPONENT'}}>
      <OtherComponent nav={{ id: 'OTHER_COMPONENT }} />
    </FocusDiv>
  );
};
import MyComponent from '#/components/MyComponent';
import MyComponent2 from '#/components/MyComponent2';

[...]
// You can also wrap the Component with PageLayout in the routes file
const MyNewView = () => {
  const getPageData = useCallback(async () => {
    const page = await getPageLayout({ id: pageId, locale: currentLocale });
    const extraData = await getExtraData();

    setPage((p) => ({
      ...p,
      id: page.id,
      theme: page.theme,
      containers: page.containers,
    }));
  }, [pageId, getExtraData]);

  useEffect(() => {
    getPageData();
  }, [id, getPageData]);


  [...]

  // Here we define an array with all the containers that we want to render in the page
  // These containers are static because it does not depends on the CMS
  // The ContainerPage component will be in charge of rendering everything.

  const staticContainers = [
    {
      component: MyComponent,
      containerNavIds: ['navIds1', 'navId2'], // all the ids for vertical scrolling used by Vertical Scroll component
                                              // the navIds must be the same that MyComponent uses for the internal ones.
      props: {
        prop1,
        prop2,
        ...
      } // the props for MyComponent
    },
    {
      component: MyComponent2,
      containerNavIds: ['navIds3', 'navId4'],
      props: {
        prop1,
        prop2,
        ...
      } // the props for MyComponent2
    }
    ...
  ];

  const containers = [...staticContainers];
  if (pageInfo.containers) {
    containers.push(...pageInfo.containers);
  }

  const pageProps = {
    id: 'myPageId', // important to preserve focus management
  };


  return (
    <ContainerPage
      backgroundUrl={pageInfo.assetData.coverUrl}
      containers={containers}
      contextData={pageInfo.assetData} // for query interpolation
      pageProps={pageProps}
    />
  );
};
Note the static containers array can contain multiple components, or one components which renders multiple components inside